ADMINISTRATOR MANUAL
www.name.cnkchurch.com/admin where “name” is your sub domain
name.
The following
menus are located at the upper right hand corner of the Administrator screen.
You will be
prompted to the following screen.
1.
Administrator sign in

User
ID:
This
is the e-mail address used at the time of registration.
Password:
The default password is given to you at the time of initial setup but it
should be changed by the administrator as soon as the account is setup.
Once the User Id and the Password are entered, click on “Sign In”. If you
enter an incorrect User ID or Password, you will be prompted with a RED warning
sign. Simply make the correction
and click on “Sign In” again. When all of the information is correctly entered
the next screen will appear.
SITE NAME: __________________________________________________
ADMIN
Command: __________________________________________________
ADMIN Login
ID: __________________________________________________
PASSWORD: __________________________________________________
2.
General configurations
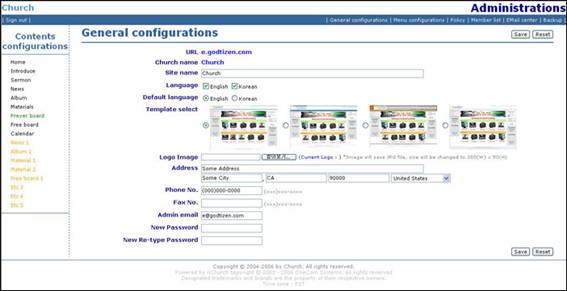
General information about the web-page can be configured through this
screen.
Site
name:
Name of the site can be entered here. This will be displayed in the upper
left hand corner of the Home Page.
Language: [ ] English [ ] Korean
You must select which language you want the system to display for instructions.
Default
Language: ( ) English ( ) Korean
Select which language will be used most often when entering data. Both
languages can be check for a bi-lingual web page.
Template
select:
You are given a choice of which basic screen to use – often this screen is referred
as the “Skin”. More options will be added for enhanced
graphical design in the future.
Logo
Image:
This is where you enter the organization’s logo. Click on the “Browse”
button to start.
Once the Logo is stored, it will have save the path where the file came
from. If you need to over-write the
logo with a new one, simply click on the “Browse” button and repeat the process.
Address:
The
following information can be entered:
Street
number and name ie:
City, ST. Zip
Code ie:
Phone
No.:
Your Phone number. ie: 408-244-4811
Fax
No.:
Your Fax number. ie: 408-241-0113
Administrator
email:
This
field is very important and is used for the Login Screen.
This
field should be changed once the website is completed.
New
Password:
This
password is also used during the Login process.
The
password should be setup so that it is easy to remember.
New
Re-type Password:
Since the screen does not display the Password being typed in, it is very
important to double-check what the Password is.
3.
Menu configurations
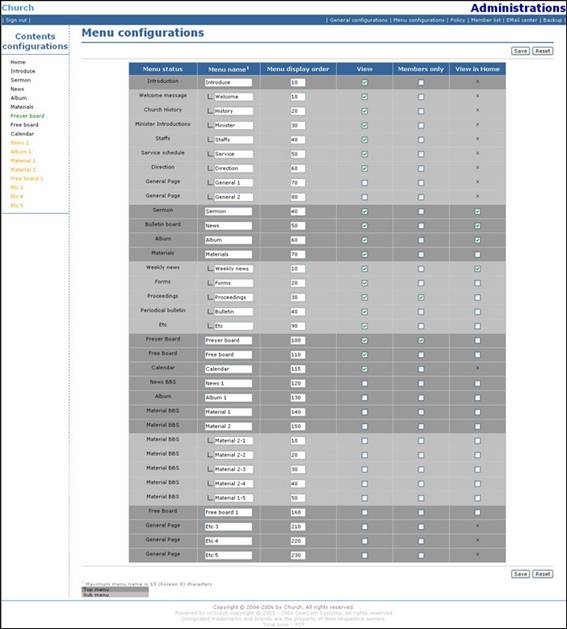
This screen
allows you to configure what is displayed on the left hand side of the webpage.
There are
two (2) separate types of “Menu names”. One is a general
menu which is displayed on the screen. The other is a “Sub-menu” which is
displayed only when the general menu is selected by the user.
Menu
status:
This is a reference column. The information in this column can NOT be
changed. Most of the content is
predefined.
Menu
names:
This is where the Administrator can change the title of the menu bars,
which can be formatted in different language fonts. Whatever is entered here,
will be displayed as is on the web page.
Menu
display order:
In general menu mode, or in sub-menu mode, these numbers are used to reset
the order in which the menus are displayed on the screen.
If you want to move the line item 60 between line 20 and line 30, simply
change the line item 60 to 25, then it will be
properly displayed and be reset to allow more changes.
View:
This allows the Administrator to control what
the actual users may see on the website. By checking the box, you activate the
toggle switch option to turn on or off the display mode. The data remains in
the system, but does not appear in the non-Administrator mode.
Members
Only:
This column controls if the user can have access to certain areas of the
webpage. If they are not a member,
they may not view the contents.
This is used to enter private or confidential information that will not
be available to anyone casually viewing the webpage.
View
in Home:
This determines the Home Page content. When this column is check, it will
automatically display two (2) of the latest entries. As new ones are added, the old entries
will be dropped from the Home Page.
The data is always stored in the proper place,
it simply does not appear on the Home Page.
*** On the left
hand side of the screen, menus are color coded.
View
–
Grey
Non-View –
Member
Only – Green
4.
Member list
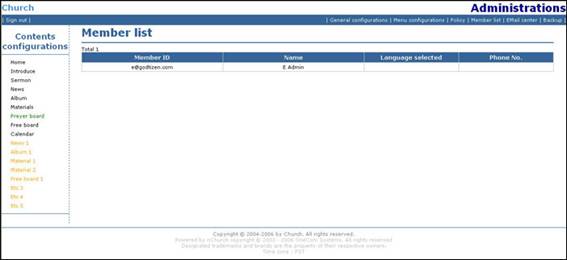
This screen
manages the member list.
Click on
each record to view their detail information.
5.
Email center
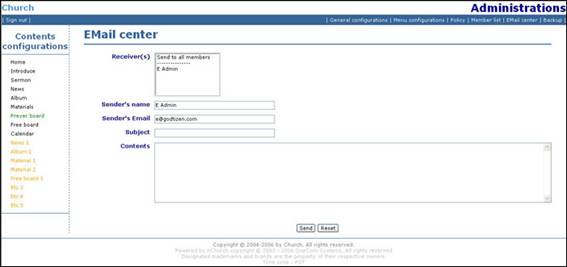
The Email
center can send emails to select members or to all members.
To send to
all members, choose “send all”.
To send to
a particular user, hold down the “CTRL-key” and choose the ones to send to.
Preview:
When you are done with the data or picture entry, click on “SAVE” button.
This will automatically update the web page and also the Preview to show you
what it will look alike by the end user.
6.
Policy Input
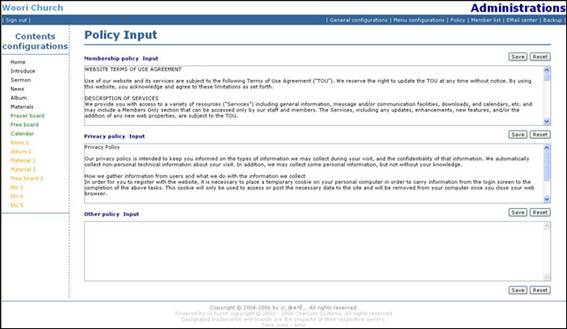
You can
enter policy information that reflects your guideline. The default policy
provided can be used as is, but it is very generic in nature. You may also want
to get some expert legal advice from an attorney or other web administrators.
7.
Backup

This allows
the data to be compressed and downloaded to your PC.
First,
click on “Click here to generate backup file”. This will compress the file and generate
two (2) files that are displayed at the lower part of the screen.
These files
can be downloaded to the PC by clicking on the file name.
*** The Restore
option is not provided to the end-user due to the complexity of the operation.
When required, contact C&K Computers for assistance.
HOME
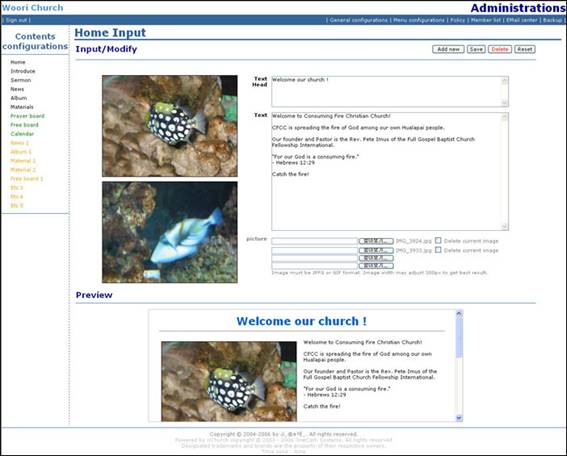
This
controls the HOME PAGE.
Text
Head:
This
is the TITLE page.
i.e.
“Welcome to our Church!”
Text:
This text will be displayed right along with the pictures and your logo on the
HOME PAGE. It is recommended that
you adjust the amount of the text and spacing to fit with the number of
pictures you are including on this page.
There is no font control provided.
Pictures:
You
may insert up to 4 pictures on this Home Page.
Simply
click on the BROWSE button and find the jpg file to insert.
***
Important ***
Depending on the speed of your Internet connection, it is very easy to
overload your upload function. The
best thing to do is upload one (1) picture file at a time. An even safer method is to reduce the
jpg file from 1Mb to 40Kb size (or 400 x 400 pixel)
before uploading. If the picture
files are reduced, you can upload all 4 pictures at once.
Preview:
When you are done with the data or picture entry, click on the “SAVE”
button. This will automatically update the web page and also the Preview to
show you the finished product.
Introduction
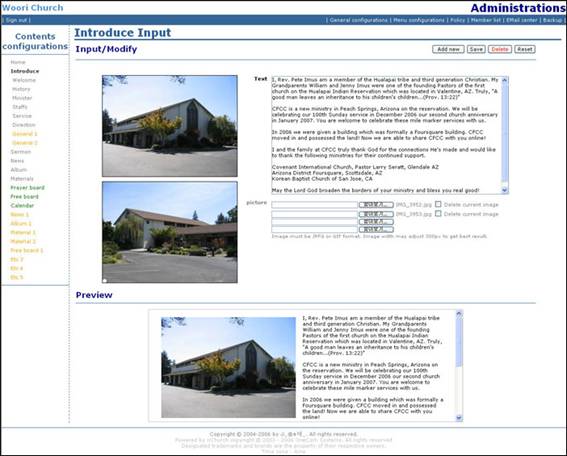
This the
first screen the end user will see after clicking on the “Introduction”
button. This also works as a master
screen for the following “sub-menu” items.
Welcome
message:
Church
History:
Minister
Intro:
Staffs:
Service:
Direction:
The items
are part of the default setup and may be drastically different if the
administrator changes the sub-menus.
Text:
This text will be displayed right next to the uploaded pictures.
It is recommended that you adjust the amount of the text and spacing to
align properly with the uploaded pictures.
Pictures:
You
may include up to 4 pictures on this Home Page.
Simply
click on the BROWSE button and find the jpg file to insert.
***
Important ***
Depending on the speed of your Internet, it is very easy to overload your
upload function. The best thing to
do is upload one (1) picture file at a time. An even safer method is to reduce the
jpg file from 1Mb to 40Kb size (or 300 x 300 pixel)
before uploading. If the picture
files are reduced, you can upload all 4 pictures at once.
Preview:
When you are done with the data or picture entry, click on the “SAVE”
button. This will automatically update the web page and also the Preview to
show you the finished product.
Welcome
message
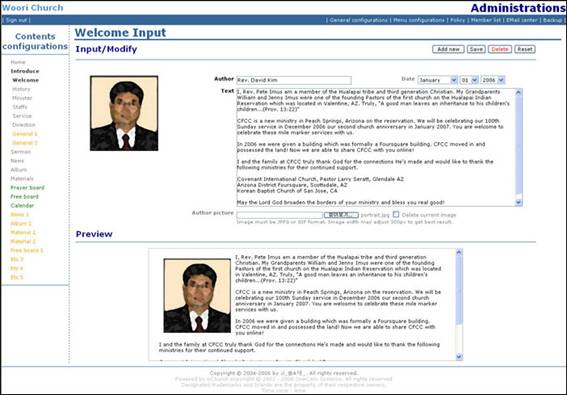
Author:
Enter
the name of the person giving the welcome message.
Date: [ Month ] [Date] [Year]
Text:
This text will be displayed right next to the uploaded pictures.
It is recommended that you adjust the amount of the text and spacing to
align properly with the uploaded pictures.
Author’s
Picture:
Only
one picture is allowed of the author and is fixed to 300 pixels.
Preview:
When you are done with the data or picture entry, click on the “SAVE”
button. This will automatically update the web page and also the Preview to
show you the finished product.
Church
History

This is a
very important ARCHIVE section of the program.
Date: [ Month ] [Date] [Year]
of the note worthy event
Subject:
Enter
the subject heading.
Text:
This section has no text limits so you can be as detailed as possible in
describing the event.
Picture:
4
pictures are permitted on this menu.
List:
*** Data will
be chronologically displayed.
[Date] [Subject] [Action]
Preview:
When you are done with the data or picture entry, click on the “SAVE”
button. This will automatically update the web page and also the Preview to
show you the finished product.
Minister
Introductions
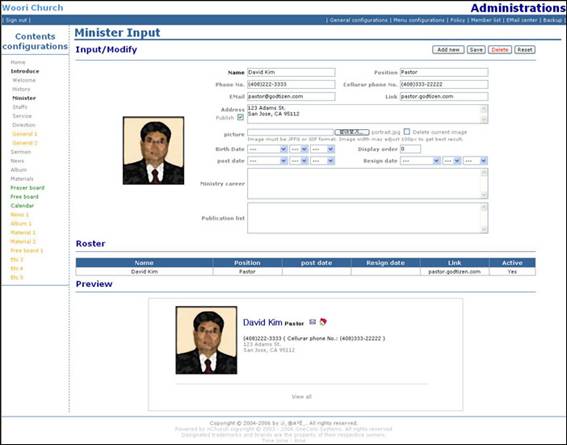
You may
enter as many ministers as you wish.
You can also control what order these ministers appear on the screen.
Name:
Name of the minister.
Position:
Position
/ Job Title
i.e. Senior
Pastor, Education
Minister, ….
Phone
Number:
Office
number or home number
Cell
Phone Number:
E-mail:
This
is going to be the reply e-mail for this person.
Link:
Every minister will have an option to create and maintain their own
website. This allows a simple
linage to the website (new frame)
Address: Public [ ]
Personal
address: Check this box to make this public or private.
Picture:
Only
one picture is allowed of the author and is fixed to 150 pixel.
Birth
Date:
Display
Order: [ ]
This
determines what order the pastors will be displayed on the screen.
Assign
the lowest number to the most recent and highest to the oldest entry.
Post
Date:
When they started their position.
Resign
Date:
When they resigned.
Ministry
Career:
Personal experiences that can be shared with the members.
Publication
List:
Any
books published or articles written in the past.
Roster:
[Name] [Position] [Post Date] [Resign Date] [Link] [Active]
Preview:
When you are done with the data or picture entry, click on the “SAVE” button.
This will automatically update the web page and also the Preview to show you the
finished product.
Staff
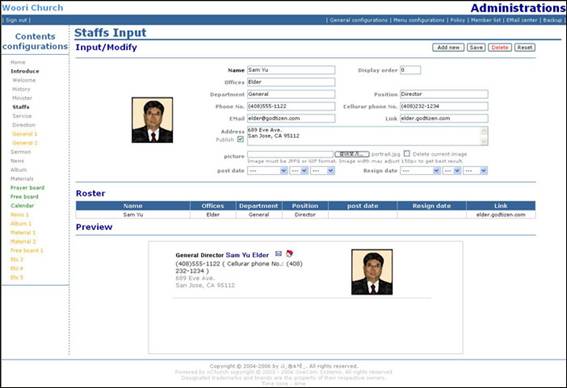
You may
enter as many ministers as you wish. You can also control what order these
ministers appear on the screen.
Name:
Name of the staff member.
Display
Order: [ ]
This
determines what order the staff will be displayed on the screen.
Assign
the lowest number to the most recent and highest to the oldest entry.
Offices: / Department: /
Position: / …. Etc
Same as that of pastors (see above)
Roster:
[Name] [Office] [Dept] [Position] [Post Date] [Resign Date] [Link]
Preview:
When you are done with the data or picture entry, click on the “SAVE”
button. This will automatically update the web page and also the Preview to
show you the finished product.
Services
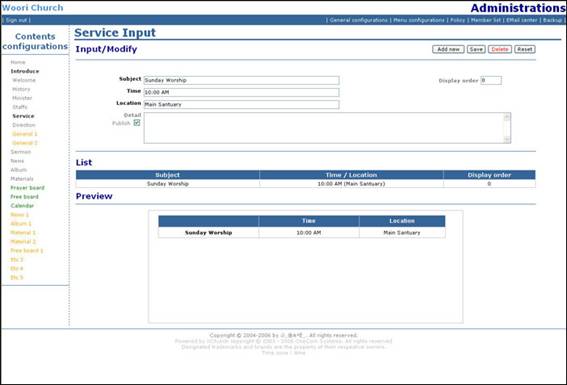
You can
enter worship time and other related information.
Preview:
When you are done with the data or picture entry, click on the “SAVE”
button. This will automatically update the web page and also the Preview to show
you the finished product.
Direction
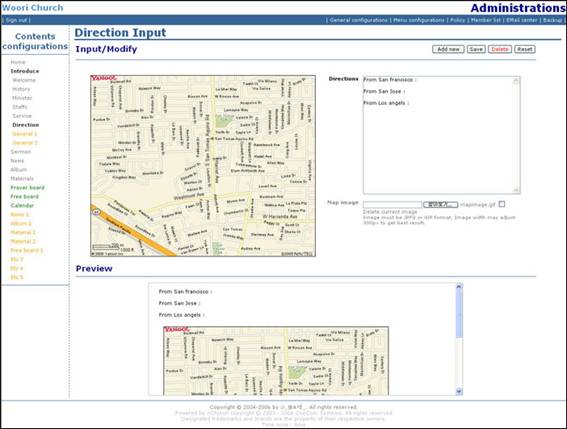
You can use
a scanned image, a copy of an Internet map, or any other form of map to display
directions. Along with your map,
you can also provide text direction to easily find your location.
To insert
map, use the browse function.
To delete
the map, use the button to delete.
The lower
part of the screen is for the PREVIEW of your map.